
Laravel Queues Explained Simply (Laravel 13)

Overview of Queues
What Are Queues?
In web applications, some tasks take too long to complete during a normal HTTP request. For example, processing a large uploaded CSV file, sending hundreds of emails, or generating a PDF report. If you do these tasks right away, the user would have to wait several seconds (or even minutes) before seeing the next page. This creates a poor user experience.
Queues solve this problem by letting you defer time‑consuming tasks to be processed in the background. Your application immediately returns a response to the user, while the heavy work happens later, outside the request cycle.
Why Are Queues Important?
- Improved user experience – pages load faster.
- Better scalability – you can add more queue workers to handle spikes in traffic.
- Reliability – if a task fails, the queue can retry it automatically.
- Resource management – you can prioritise certain jobs (e.g., process high‑priority tasks first).
Real‑World Example
Suppose, you run a podcast website. When a user uploads a new episode, you need to:
- Convert the audio file to different formats.
- Generate a thumbnail.
- Update search indexes.
- Send confirmation emails to subscribers.
Doing all this synchronously would make the upload feel very slow. Instead, after the user uploads the file, you dispatch a job to a queue. The user sees “Upload successful” immediately, while behind the scenes a queue worker processes the conversion, thumbnails, etc.
Fundamental Concepts of Laravel Queues
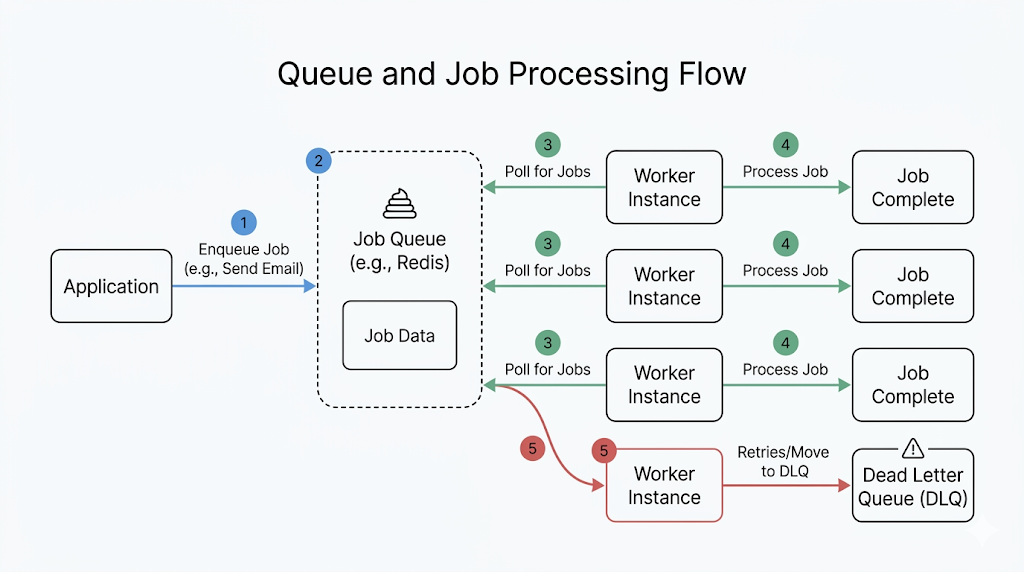
Jobs – The Unit of Work
A job is a simple PHP class that contains the logic for a task you want to run in the background. For example, a ProcessPodcast job might contain the code to convert an audio file.
You create a job using Artisan: php artisan make:job ProcessPodcast
Here’s what a basic job looks like:
<?php

namespace App\Jobs;

use App\Models\Podcast;
use Illuminate\Contracts\Queue\ShouldQueue;
use Illuminate\Foundation\Queue\Queueable;

class ProcessPodcast implements ShouldQueue
{
    use Queueable;

    public function __construct(public Podcast $podcast)
    {}

    public function handle(): void
    {
        // The actual work happens here
        // e.g., convert audio, generate thumbnail...
    }
}
ShouldQueuetells Laravel to push this job to a queue instead of running it immediately.- The
handle()method is called when the queue worker processes the job.
Connections vs. Queues
Think of your application’s queue system like a post office:
- Connection = the postal service you choose (e.g., regular mail, express courier, or a local drop‑off). In Laravel, connections are backends like
database,redis, orsqs. They are defined inconfig/queue.php. - Queue = a specific pile or mailbox inside that service. You can have multiple queues per connection, like “emails”, “reports”, “thumbnails”.
By default, every job goes into the default queue of the default connection. But you can send a job to a specific queue:
ProcessPodcast::dispatch($podcast)->onQueue('processing');
This helps you prioritise work: you can tell a queue worker to process the high queue before the low queue.
Dispatching Jobs – Adding Work to the Queue
To send a job to the queue, you call the dispatch method on the job class:
use App\Jobs\ProcessPodcast;

ProcessPodcast::dispatch($podcast);
You can also delay the job:
ProcessPodcast::dispatch($podcast)->delay(now()->addMinutes(10));
If you ever need to run a job immediately (in the same request), use dispatchSync() – useful for testing or very quick tasks.
Queue Worker – The Engine That Processes Jobs
A queue worker is a long‑running PHP process that constantly checks the queue for new jobs. When it finds one, it executes the job’s handle() method.
Start a worker with:
php artisan queue:work
By default, the worker will run forever. For production, you should use a process monitor like Supervisor to automatically restart the worker if it crashes.
Important: Workers keep your application in memory. If you change your code, you must restart the worker:
php artisan queue:restart
Handling Failures – What If Something Goes Wrong?
Sometimes a job fails (e.g., an external API is down). Laravel can retry the job a number of times before giving up.
You set the maximum attempts:
- Globally for the worker:
php artisan queue:work --tries=3 - Or on the job class using the
#[Tries(3)]attribute.
When all attempts fail, Laravel stores the failed job in a failed_jobs database table. You can then retry failed jobs manually:
php artisan queue:retry all
You can also define a failed() method inside your job to run custom cleanup or notifications when a job finally fails.
Putting It All Together – A Simple Workflow
Let's put the steps together for the real‑world example:
- User uploads a podcast → Controller dispatches a
ProcessPodcastjob. - User receives “success” response immediately.
- Queue worker (running separately) picks up the job.
- Worker executes the
handle()method (converts audio, etc.). - If the job fails, Laravel retries it up to the configured limit.
- After final failure, the job appears in the
failed_jobstable for you to inspect and retry.
Let's now explore some advanced features of Laravel queues that can help you manage complex workflows and ensure your jobs run smoothly.
Job Middleware – Adding Layers to Your Jobs
Sometimes you want to run some code before or after your job executes, without cluttering the job’s handle() method. Job middleware lets you wrap custom logic around your job’s execution.
Think of it like a “filter” for your job. For example, you might want to:
- Rate‑limit how often a job can run.
- Prevent two identical jobs from running at the same time.
- Skip the job if a certain condition is not met.
Creating a Job Middleware
You can generate a middleware class with Artisan:
php artisan make:job-middleware RateLimited
A middleware class contains a handle() method that receives the job and a closure ($next). You perform your checks, and then call $next($job) to continue processing.
Example – a simple rate limiter middleware:
<?php

namespace App\Jobs\Middleware;

use Closure;
use Illuminate\Support\Facades\Redis;

class RateLimited
{
    public function handle(object $job, Closure $next): void
    {
        Redis::throttle('key')
            ->allow(1)->every(5)
            ->then(function () use ($job, $next) {
                $next($job);   // job can run
            }, function () use ($job) {
                $job->release(5); // try again after 5 seconds
            });
    }
}
Attaching Middleware to a Job
Inside your job class, add a middleware() method that returns an array of middleware objects:
use App\Jobs\Middleware\RateLimited;

class ProcessPodcast implements ShouldQueue
{
    // ...

    public function middleware(): array
    {
        return [new RateLimited];
    }
}
Now every time ProcessPodcast is processed, the RateLimited middleware will be applied.
Built‑in Middleware
Laravel provides several helpful middleware out of the box:
RateLimited– limit how often a job runs based on a rate limiter you define.WithoutOverlapping– prevent two jobs with the same “key” from running simultaneously.ThrottlesExceptions– if a job fails repeatedly, stop trying for a while.SkipIfBatchCancelled– for batch jobs, skip processing if the batch was cancelled.
Using middleware keeps your jobs clean and focused on their primary task.
Job Batching – Managing Groups of Jobs
Sometimes you need to run a set of jobs in parallel and then do something when they all finish. Job batching is perfect for this. You can think of it as a “parent” that tracks a group of jobs and notifies you when the group is complete.
Setting Up Batches
First, create a table to store batch information:
php artisan make:queue-batches-table
php artisan migrate
Creating a Batch
Use the Bus facade to define a batch of jobs:
use App\Jobs\ImportCsv;
use Illuminate\Support\Facades\Bus;

$batch = Bus::batch([
    new ImportCsv(1, 100),
    new ImportCsv(101, 200),
    new ImportCsv(201, 300),
])->then(function ($batch) {
    // All jobs completed successfully
})->catch(function ($batch, $e) {
    // A job failed
})->dispatch();
You can also add callbacks for when the batch is created (before) or for progress updates (progress). Each callback receives the Batch instance, which you can use to inspect the batch’s status.
Working with Batches Inside a Job
Inside a batchable job, you can access the current batch via the batch() method:
use Illuminate\Bus\Batchable;

class ImportCsv implements ShouldQueue
{
    use Batchable;

    public function handle()
    {
        if ($this->batch()->cancelled()) {
            return;
        }
        // process a chunk...
    }
}
Inspecting Batches
You can retrieve a batch by its ID and return it from a route to show progress in your frontend:
Route::get(‘/batch/{batchId}’, function ($batchId) {
    return Bus::findBatch($batchId);
});
The returned JSON contains properties like totalJobs, pendingJobs, failedJobs, and progress().
Adding Jobs to an Existing Batch
Sometimes you don’t know all jobs upfront. You can dispatch a “loader” job that adds more jobs to the batch:
$this->batch()->add([
    new ImportCsv(301, 400),
    // ...
]);
Batching is ideal for tasks like importing large files, sending newsletters, or any workflow where you need to wait for multiple independent tasks to complete.
Unique Jobs – Preventing Duplicate Work
There are scenarios where you absolutely do not want the same job to be queued twice while a previous instance is still running. For example, you might have a job that rebuilds a user’s search index. If the user triggers the rebuild multiple times in a row, you want only one to actually run.
Laravel provides the ShouldBeUnique interface for this.
Making a Job Unique
Implement the interface on your job class:
use Illuminate\Contracts\Queue\ShouldBeUnique;

class UpdateSearchIndex implements ShouldQueue, ShouldBeUnique
{
    // ...
}
Now if you dispatch this job while another instance is still in the queue (or processing), the new dispatch will be ignored.
Defining the Uniqueness Key
Often you want uniqueness based on some model ID. Override the uniqueId() method:
public function uniqueId()
{
    return $this->user->id;
}
Now only one UpdateSearchIndex job per user ID will be queued at a time.
Uniqueness Timeout
You can also specify how long the uniqueness lock should last using the UniqueFor attribute:
use Illuminate\Queue\Attributes\UniqueFor;

#[UniqueFor(3600)] // 1 hour
class UpdateSearchIndex implements ShouldQueue, ShouldBeUnique
If the job hasn’t finished within that time, another job with the same key can be dispatched.
Unique Until Processing
By default, the lock is released after the job finishes (or fails). If you want the lock to be released as soon as processing begins (so that subsequent jobs can queue behind), implement ShouldBeUniqueUntilProcessing instead.
Unique jobs are a simple but powerful way to avoid redundant work.
Queue Priorities – Handling Important Work First
When you have different types of jobs, you may want some to be processed before others. Laravel lets you assign jobs to different “queues” (like “high” and “low”) and then tell the worker which queues to process in which order.
Dispatching to a Specific Queue
ProcessPodcast::dispatch($podcast)->onQueue('high');
Running a Worker with Priority
Start the worker with a comma‑separated list of queues, ordered by priority:
php artisan queue:work --queue=high,low
Now the worker will process all jobs from the high queue before moving to the low queue. If the high queue is empty, it will process jobs from low.
Default Queue
You can set a default queue for a connection in config/queue.php under the queue key. For example:
'redis' => [
    'driver' => 'redis',
    'queue' => 'default',
    // ...
],
Priorities are essential when you have time‑sensitive jobs (like sending password reset emails) that should not wait behind bulk imports.
Testing Queues – Keeping Your Tests Fast
When testing code that dispatches jobs, you don’t want to actually run the jobs. That would slow down tests and might have side effects. Laravel provides a Queue facade with a fake() method that intercepts job dispatches.
Basic Fake and Assertions
use Illuminate\Support\Facades\Queue;

public function test_orders_are_shipped()
{
    Queue::fake();

    // Call your code that dispatches a job...
    // e.g., $this->post(‘/orders’, [...]);

    Queue::assertPushed(ShipOrder::class);
    Queue::assertPushedTimes(ShipOrder::class, 1);
    Queue::assertPushedOn(‘shipping’, ShipOrder::class);
}
You can also pass a closure to make more specific assertions:
Queue::assertPushed(function (ShipOrder $job) use ($order) {
    return $job->order->id === $order->id;
});
Faking Only Specific Jobs
If you want to let some jobs run normally while faking others, pass an array of class names to fake():
Queue::fake([ShipOrder::class]); // only ShipOrder is faked, others run
Testing Job Chaining and Batching
For chains and batches, use Bus::fake() instead:
Bus::fake();

// Dispatch chain or batch...

Bus::assertChained([ProcessPodcast::class, OptimizePodcast::class]);
Bus::assertBatched(function ($batch) {
    return $batch->jobs->count() === 3;
});
Testing with fakes ensures your tests remain fast and focused on the dispatching logic, not the actual job execution.
Common Pitfalls and Best Practices
Even with a solid understanding, beginners often stumble on a few points. Here are some tips to avoid trouble.
1. Restart Workers After Deployments
Workers keep the application in memory. If you change code (e.g., in handle()), the running worker won’t see the changes. Always run:
php artisan queue:restart
after deployment. The command sends a signal that causes workers to exit gracefully after their current job.
2. Set Appropriate retry_after and Timeout Values
In config/queue.php, each connection has a retry_after value. This is how long the queue driver waits before making a job available again if it’s not completed. If your job takes longer than this, the driver will think it failed and retry it, leading to duplicate processing.
- Ensure
retry_afteris longer than your longest‑running job. - Also set the worker timeout with
--timeout– this should be less thanretry_after.
Example:
- Job takes up to 90 seconds → set
retry_after = 120and--timeout=100.
3. Use the Database Queue Driver for Development
The database driver is the easiest to set up and inspect. Run php artisan make:queue-table and php artisan migrate. You can then look at the jobs table to see what’s pending.
4. Handle Failures Gracefully
Always define a failed() method on jobs that might need cleanup or user notification:
public function failed(Throwable $exception): void
{
    Log::error(‘Job failed: ‘ . $exception->getMessage());
    $this->podcast->update([‘status’ => ‘failed’]);
}
5. Keep Jobs Small and Focused
A job should do one thing. If you need multiple steps, consider chaining jobs or using batches. Large, complex jobs are harder to debug and retry.
6. Monitor Your Queues
Schedule queue:monitor to detect when a queue gets too long. Combine it with notifications to stay ahead of issues.
7. Beware of Database Transactions
If you dispatch a job inside a database transaction, the job may run before the transaction is committed, causing it to see stale data. Use the afterCommit() method:
ProcessPodcast::dispatch($podcast)->afterCommit();
Or set the after_commit option in your queue connection configuration to true.
Conclusion
Queues are one of the most powerful features of Laravel. They turn a slow, synchronous application into a fast, responsive one. Start simple – use the database driver, create a few jobs, run a worker manually, and then gradually explore advanced features like job middleware, batching, and custom retry strategies.
Here are some helpful tips:
- Set up the database queue driver – run
php artisan make:queue-tableandphp artisan migrateto create the jobs table. This is the easiest driver to start with. - Use Supervisor in production to keep your workers alive. A typical
laravel-worker.conffile runs 8 workers and restarts them automatically. - Monitor your queues – Laravel can dispatch a
QueueBusyevent when a queue exceeds a certain size. Use it to send alerts. - Testing – Use
Queue::fake()in your tests to prevent real queue processing, and assert that jobs were dispatched.
Thanks for reading!